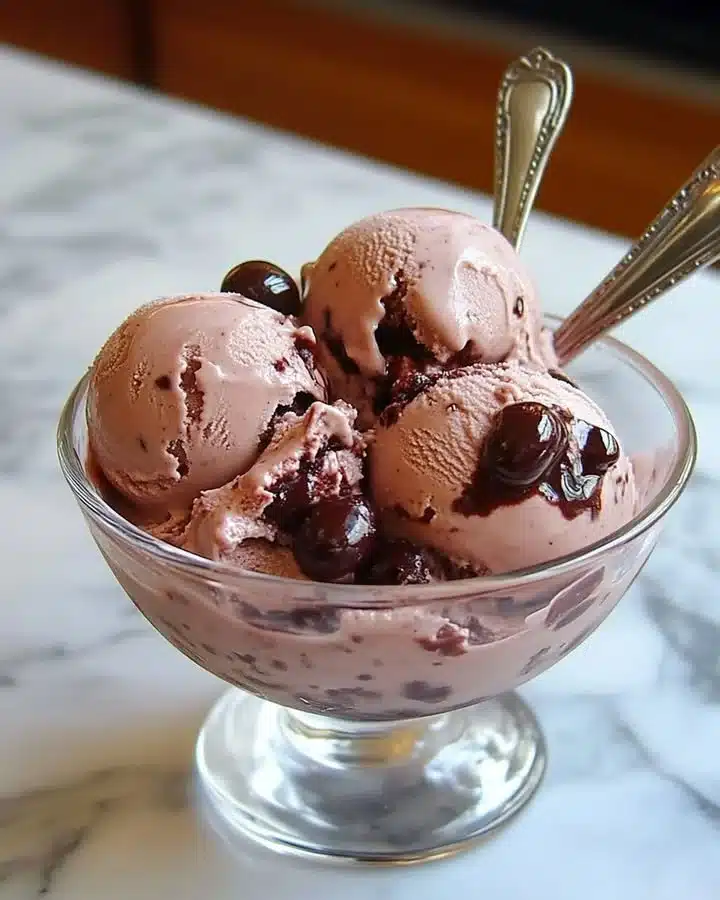
Homemade Cherry Ice Cream
Nothing beats a bowl of creamy, homemade ice cream on a hot summer day, especially when it’s loaded with the sweet and tangy flavor of fresh cherries. Making homemade cherry ice cream is simpler than you might think, and with just a few ingredients, you can whip up a delightful treat that will impress family and friends alike. The combination of rich cream and fresh cherries creates a refreshing dessert that’s sure to become a favorite.
Why Make This Homemade Cherry Ice Cream
This homemade cherry ice cream stands out for its vibrant flavor and creamy texture. Using fresh cherries allows you to harness the natural sweetness and tartness of the fruit, making every bite a burst of summer. Unlike store-bought varieties that can be loaded with additives and artificial flavors, this recipe uses simple, wholesome ingredients. Plus, it’s an impressive dessert that you can customize with your favorite mix-ins or toppings. Whether it’s for a backyard barbecue or a quiet evening at home, this ice cream is perfect for any occasion!
How to Make Homemade Cherry Ice Cream
Making homemade cherry ice cream involves a few easy steps, starting with preparing the cherries to allow their flavors to shine. The process is straightforward, even for novice cooks. With an ice cream maker, you’ll have a luscious treat ready in no time!
Ingredients:
- 2 cups cherries, pitted and halved
- 1 cup heavy cream
- 1 cup whole milk
- 3/4 cup granulated sugar
- 1 teaspoon vanilla extract
- Pinch of salt
Directions:
- Toss the pitted and halved cherries into a medium bowl with 1/4 cup of sugar and let them sit for about 30 minutes to macerate. This helps to draw out the juice and enhance their flavor.
- In a separate bowl, whisk together the heavy cream, whole milk, the remaining sugar, vanilla extract, and a pinch of salt until the sugar is fully dissolved. The mixture should be smooth and creamy.
- Fold the cherry mixture into the cream mixture and stir until fully combined. The cherries will add a beautiful color and texture to your ice cream.
- Pour the mixture into an ice cream maker and churn according to the manufacturer’s instructions until you achieve a soft-serve consistency.
- Transfer the ice cream into a lidded container and freeze for at least 4 hours, or until firm. This step is crucial for the perfect scoop.
- Serve your homemade cherry ice cream in bowls or cones and enjoy the delightful taste of homemade goodness!
Nutritional Information
Each serving of this homemade cherry ice cream (approximately 1/2 cup) contains:
- Calories: 250
- Total Fat: 14g
- Saturated Fat: 8g
- Carbohydrates: 28g
- Sugars: 22g
- Protein: 3g
- Cholesterol: 55mg
- Sodium: 50mg
(Note: Nutritional values may vary based on specific ingredients and portion sizes.)
How to Serve Homemade Cherry Ice Cream
This cherry ice cream is versatile and can be served in various ways. Enjoy it in classic ice cream cones, or for a fancier touch, dish it into a sundae glass topped with whipped cream, chocolate shavings, or a cherry on top. It also pairs wonderfully with warm desserts like brownies or pie, delivering an indulgent contrast in temperature and texture. For a refreshing twist, serve it alongside a slice of angel food cake or a fruit salad for a lovely dessert platter.
How to Store Homemade Cherry Ice Cream
To keep your homemade cherry ice cream fresh, store it in an airtight container in the freezer. It will stay delicious for up to two weeks. If you find your ice cream is hard when you take it out of the freezer, let it sit at room temperature for a few minutes before scooping. This will make it much easier to serve.
Expert Tips for Perfect Homemade Cherry Ice Cream
- Choosing Cherries: Use ripe, sweet cherries for the best flavor. If fresh cherries aren’t available, you can opt for frozen cherries—just thaw and drain them before use.
- Churning: Don’t over-churn the mixture, as this can lead to icy ice cream. Stop once you reach a soft-serve consistency.
- Mix-ins: Feel free to add extra mix-ins, such as chocolate chips, crushed nuts, or other fruit, during the last few minutes of churning.
- Adjusting Sweetness: Taste the cherry mixture before adding it to the cream mixture. If the cherries are very tart, you might want to increase the sugar slightly.
Delicious Variations
Experiment with this recipe by introducing new flavors! Here are some ideas:
- Chocolate Cherry Swirl: Add chocolate syrup when folding in the cherries for a delightful chocolate-covered cherry experience.
- Almond Cherry Ice Cream: Substitute a portion of the vanilla extract with almond extract for a unique flavor profile.
- Cherry Cheesecake Ice Cream: Incorporate some cream cheese into the mixture for a rich, cheesecake-like texture and flavor.
Frequently Asked Questions
-
Can I use other fruits besides cherries?
- Absolutely! This ice cream base works well with other fruits such as strawberries, blueberries, or peaches. Just adjust the sugar according to the sweetness of the fruit.
-
What if I don’t have an ice cream maker?
- You can make ice cream without a machine by placing the mixture in a freezer-safe container and stirring every 30 minutes for about 3-4 hours until it reaches the desired consistency.
-
Is there a dairy-free version of this recipe?
- Yes! You can substitute the heavy cream and whole milk with coconut cream and almond or oat milk for a dairy-free version. Use a dairy-free sweetener if desired.
Conclusion
Homemade cherry ice cream is an easy, delightful treat that brings the fresh taste of summer right to your table. Simple to make and incredibly satisfying, it provides a wonderful way to enjoy delicious cherries. Whether you’re sharing it at a gathering or indulging in a sweet moment alone, this recipe is sure to please. So gather your ingredients and get ready to create a delightful homemade dessert that you’ll want to make all season long! Enjoy and let us know how yours turns out!
Print
Homemade Cherry Ice Cream
- Total Time: 270 minutes
- Yield: 4 servings 1x
- Diet: Vegetarian
Description
A creamy and refreshing homemade cherry ice cream loaded with the sweet and tangy flavor of fresh cherries.
Ingredients
- 2 cups cherries, pitted and halved
- 1 cup heavy cream
- 1 cup whole milk
- 3/4 cup granulated sugar
- 1 teaspoon vanilla extract
- Pinch of salt
Instructions
- Toss the pitted and halved cherries into a medium bowl with 1/4 cup of sugar and let them sit for about 30 minutes to macerate.
- In a separate bowl, whisk together the heavy cream, whole milk, the remaining sugar, vanilla extract, and a pinch of salt until the mixture is smooth.
- Fold the cherry mixture into the cream mixture until fully combined.
- Pour the mixture into an ice cream maker and churn according to the manufacturer’s instructions until soft-serve consistency is reached.
- Transfer the ice cream into a lidded container and freeze for at least 240 minutes, or until firm.
- Serve in bowls or cones and enjoy!
Notes
Use ripe, sweet cherries for the best flavor. You can substitute frozen cherries if fresh ones aren’t available.
- Prep Time: 30 minutes
- Cook Time: 0 minutes
- Category: Dessert
- Method: Churning
- Cuisine: American
Nutrition
- Serving Size: 1/2 cup
- Calories: 250
- Sugar: 22g
- Sodium: 50mg
- Fat: 14g
- Saturated Fat: 8g
- Unsaturated Fat: 6g
- Trans Fat: 0g
- Carbohydrates: 28g
- Fiber: 1g
- Protein: 3g
- Cholesterol: 55mg
Keywords: ice cream, cherry dessert, homemade ice cream